Setting up a deployment
The steps below will guide you through setup of a Tator deployment. By the end you should be able to open Tator in your browser. The tutorial is assuming you are starting with a fresh (or near fresh) install of Ubuntu Linux 20.04. Other distributions may also work, but steps are literal to the Ubuntu platform.
To serve the web application, the tutorial will use DuckDNS to create a domain for the app.
For hardware, you can use a single virtual machine, a single node, or a cluster of nodes in a local area network. For LAN-only deployments, the DuckDNS subdomain can be configured to point to a LAN-local address via its DNS entry.
We recommend going through the full tutorial at least once using a single node or VM. After that, feel free to skip some steps if you already have a domain, NFS server, or Kubernetes cluster. The full tutorial assumes you are starting with just bare metal.
Architectural Pieces
A Tator deployment makes use of one or more kubernetes clusters. This tutorial walks you through setting up one kubernetes cluster for both job serving (algorithm workflows) and the actual website hosting.
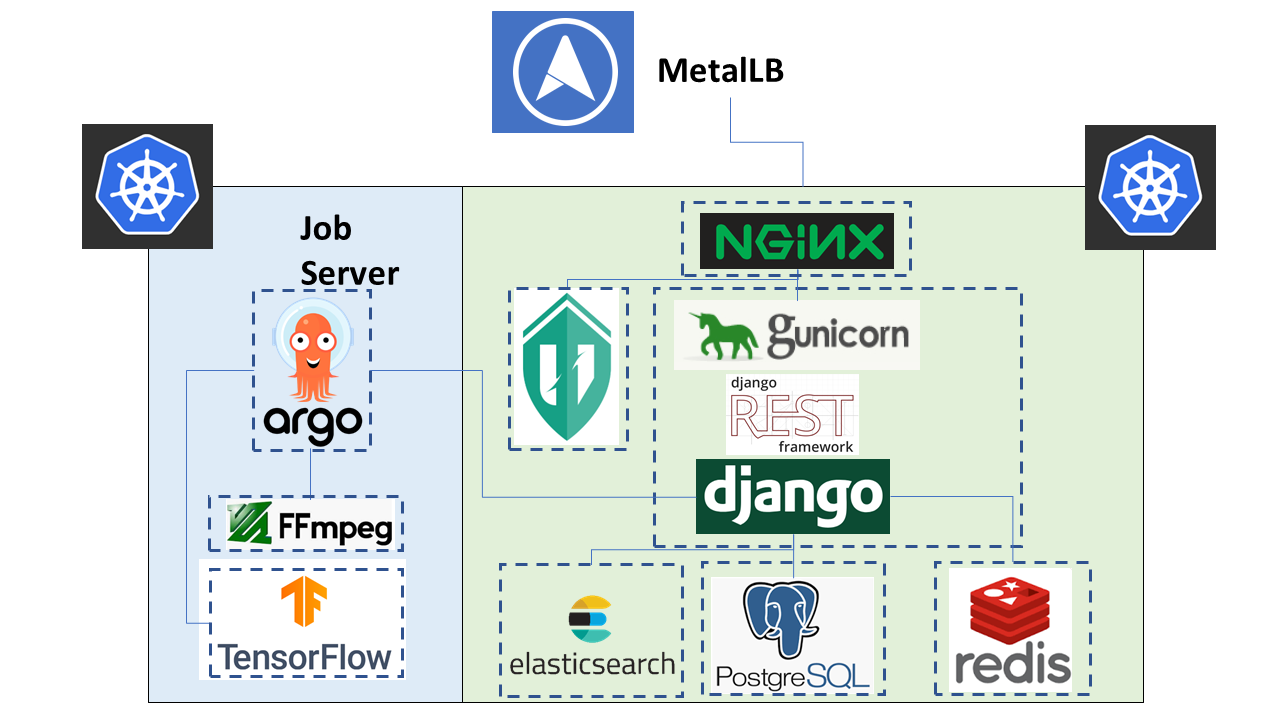
The green/blue boxes above denote where one can seperate the deployment to two seperate kubernetes clusters. There are many components within a Tator deployment, a summary of the core components is below:
- Argo
- An extension to kubernetes to define a new job type called a workflow. This allows for defining the execution of complex algorithms or routines across a series of pods based on the description. Argo is develoiped and maintained by Intuit.
- Django
- The python web framework used by tator online for handling dynamic web content and REST interactions.
- Elastic Search
- Complement to the PostgresSQL database to allow for faster searches.
- Job Server
- The job server is the kuberneters cluster that has Argo installed to run asynchronous jobs for the tator deployment.
- Kubernetes
- The underlying system used to deploy and manage the containerized application. Kubernetes or k8s relays on a working Docker installation.
- MetalLB
- The load balancer used in a bare metal deployment of kubernetes. The load balancer is configured via loadBalancerIp to forward traffic seen at that IP to the internal software network of kubernetes. Advanced configuration of load balancing failovers is not covered in this tutorial. As an example an IP address of 192.168.1.221 can be used if it is both outside the DHCP range of the network and visible to the master node of the kubernetes cluster.
- NGINX
- The web server used to handle both static serving of files as well as forwarding to dynamic content created by django.
- PostgresSQL
- SQL-compliant database used to store project configurations as well as media and associated metadata.
Networking considerations
If attempting to utilize a bare metal installation some thought should go into the IP address schema used by system. A static IP address for the server(s) running k8s is required. On the network an IP address for the MetalLB loadbalancer should also be assigned. It is helpful if the underlying MetalLB address is the same as the underlying NIC address; as otherwise ICMP messages like ping are not responded appropriately at that address.
Lastly, if behind a NAT firewall and outside traffic is desired to the web application, port forwarding must be enabled on your network’s router. To be exact, ports 443 and port 80 must be forwarded to the load balancer IP via the NAT router.
Installation of Prerequisites
NFS and other standard packages
1 | sudo apt-get install nfs-common
|
Install Docker
- Install docker on each node. Make sure it is version 19.03.12
1 2 3 4 5 6 7 8 9 10 11 12 13 | sudo apt-get remove docker docker-engine docker.io containerd runc
sudo apt-get install \
apt-transport-https \
ca-certificates \
curl \
gnupg-agent \
software-properties-common
curl -fsSL https://download.docker.com/linux/ubuntu/gpg | sudo apt-key add -
sudo add-apt-repository \
"deb [arch=amd64] https://download.docker.com/linux/ubuntu \
focal stable"
sudo apt-get update
sudo apt-get install docker-ce=5:19.03.12~3-0~ubuntu-focal docker-ce-cli=5:19.03.12~3-0~ubuntu-focal containerd.io
|
- Add yourself to the docker group
sudo usermod -aG docker $USER
- Restart terminal or reboot to update groups
- Log in to dockerhub
docker login
Enter your credentials for dockerhub.com.
For GPU nodes, install nvidia-docker
- Make sure your node has the latest PPA provided graphics driver.
1 2 3 4 | sudo add-apt-repository ppa:graphics-drivers/ppa
sudo apt-get update
sudo apt-get install nvidia-430
sudo apt-get install nvidia-docker2``
|
Configure the docker daemon
Unless the local registry is setup to use authentication, the docker client on each node needs to add it to its list of insecure-registries. Additionally, the maximum log size and parameters for GPU nodes should be set here.
- Open /etc/docker/daemon.json
- If the node is CPU only, add the following content with the hostname of the node running the registry instead of ‘localhost’:
1 2 3 4 5 6 7 8 9 | {
"exec-opts": ["native.cgroupdriver=systemd"],
"log-driver": "json-file",
"log-opts": {
"max-size": "100m"
},
"storage-driver": "overlay2",
"insecure-registries":["localhost:5000"]
}
|
- If the node is a GPU worker, add the following:
1 2 3 4 5 6 7 8 9 10 11 12 13 14 15 16 | {
"default-runtime": "nvidia",
"runtimes": {
"nvidia": {
"path": "/usr/bin/nvidia-container-runtime",
"runtimeArgs": []
}
},
"exec-opts": ["native.cgroupdriver=systemd"],
"log-driver": "json-file",
"log-opts": {
"max-size": "100m"
},
"storage-driver": "overlay2",
"insecure-registries":["localhost:5000"]
}
|
- Restart the docker daemon:
1 2 | sudo systemctl daemon-reload
sudo systemctl restart docker
|
Install Kubernetes
- Install Kubernetes 1.17.11 on all cluster nodes.
1 2 3 4 5 6 7 8 9 10 11 12 13 | sudo su
apt-get update
apt-get install -y apt-transport-https curl
curl -s https://packages.cloud.google.com/apt/doc/apt-key.gpg | apt-key add -
cat <<EOF >/etc/apt/sources.list.d/kubernetes.list
deb https://apt.kubernetes.io/ kubernetes-xenial main
EOF
apt-get update
apt-get install -qy kubelet=1.17.11-00 kubectl=1.17.11-00 kubeadm=1.17.11-00
apt-mark hold kubelet kubectl kubeadm kubernetes-cni
sysctl net.bridge.bridge-nf-call-iptables=1
iptables -P FORWARD ACCEPT
exit
|
Install helm
To build Tator you will need Helm 3 somewhere on your path.
- Download and extract helm:
1 2 | wget https://get.helm.sh/helm-v3.2.3-linux-amd64.tar.gz
tar xzvf helm-v3.2.3-linux-amd64.tar.gz
|
- Add the executable to your PATH in bashrc:
export PATH=$HOME/linux-amd64:$PATH
Get a domain from DuckDNS
- Navigate to DuckDNS to setup domain.
- Choose a login method and log in.
- Type in a subdomain (for example, mydomain.duckdns.org). This is the address you will use to access Tator from your browser.
- Click “Add domain”.
Node setup
Make sure each of your nodes is running Ubuntu 20.04 LTS and that all nodes are connected in a LAN. It is recommended that the nodes that will be used for your Kubernetes cluster are not used for any other purpose.
Kubernetes Pre-flight Setup
- Kubernetes requires that swap be disabled. Run the following on all cluster nodes:
sudo swapoff -a
- Modify /etc/fstab and comment out the swap volume.
Configuring a local docker registry
Depending on your values.yaml configuration, Tator requires a local registry is available for storing custom Docker images. We will set up a docker registry using the registry docker container.
Start the docker registry
docker run -d -p 5000:5000 --restart=always --name registry registry:2
Set the docker values in values.yaml
- Set dockerRegistry to the registry you plan to use. For the default case, this will be the node name and port where you set up the docker registry. For instance,
mydockernode:5000. - Set dockerUsername and dockerPassword to the credentials for that registry. These can be left blank if you did not set them when creating the local docker registry.
Setting up NFS
Tator creates all Kubernetes persistent volumes using a single NFS share with a particular directory layout. The subdirectories are as follows:
- The media directory is for storing transcoded media.
- The upload directory is for storing temporary upload data.
- The static directory contains static website files (javascript, images).
- The raw directory is for storing raw media.
- The backup directory is for storing database backups.
- The migrations directory is for storing migrations.
A second NFS share is used for dynamic provisioning of persistent volumes. In this tutorial, we will share it separately under the subdirectory scratch.
Example exports file
Create a file called at /etc/exports in your node home directory that we will use for defining the NFS shares and put the following content into it, changing the subnet to the subnet your master node is on (e.g. 192.168.0.0 or 169.254.0.0):
1 2 | /media/kubernetes_share 192.168.1.0/255.255.255.0(rw,async,no_subtree_check)
/media/kubernetes_share/scratch 192.168.1.0/255.255.255.0(rw,async,no_subtree_check)
|
Preparing NFS server node
- Create the directory structure:
1 2 3 4 5 6 7 8 9 10 | mkdir /media/kubernetes_share
mkdir /media/kubernetes_share/media
mkdir /media/kubernetes_share/static
mkdir /media/kubernetes_share/backup
mkdir /media/kubernetes_share/raw
mkdir /media/kubernetes_share/upload
mkdir /media/kubernetes_share/migrations
mkdir /media/kubernetes_share/scratch
mkdir /media/kubernetes_share/elasticsearch
mkdir /media/kubernetes_share/postgres
|
- Set NFS permissions:
1 2 | sudo chown -R nobody:nogroup /media/kubernetes_share
sudo chmod -R 777 /media/kubernetes_share
|
Database storage
Database performance is dependent on high speed storage. Tator currently runs databases using a single pod with persistent storage mounted via host path rather than NFS. This means during the build phase an environment variable specifying the host path must be defined, and that the node that runs Postgres must be specified via node label. These steps are described in the kubernetes and build setup steps.
Kubernetes Cluster Setup
Resetting kubernetes configuration
- If something goes wrong during Kubernetes cluster setup, you can reset each of your nodes with the following commands:
1 2 3 4 5 6 | sudo apt-mark unhold kubelet kubectl kubeadm kubernetes-cni
sudo kubeadm reset
sudo apt-get purge kubeadm kubectl kubelet kubernetes-cni kube*
sudo apt-get autoremove
sudo rm -rf ~/.kube
sudo reboot
|
- You would then need to repeat the installation steps.
Set up the Kubernetes master node
The master node is where the Kubernetes cluster is administered.
- Initialize the master node:
sudo kubeadm init --apiserver-advertise-address=<MASTER_NODE_IP_ADDRESS> --pod-network-cidr=10.217.0.0/16
Replace the master node ip address with the IP address of your machine. Note that the pod network CIDR above is required to use the CNI plugin Cilium. It will take a little while for kubeadm to initialize the master node.
- Configure kubectl to run without sudo:
1 2 3 | mkdir -p $HOME/.kube
sudo cp -i /etc/kubernetes/admin.conf $HOME/.kube/config
sudo chown $(id -u):$(id -g) $HOME/.kube/config
|
- Install Cilium:
kubectl create -f https://raw.githubusercontent.com/cilium/cilium/v1.6/install/kubernetes/quick-install.yaml
and wait until all Cilium pods are marked as READY by monitoring with:
kubectl get pods -n kube-system --selector=k8s-app=cilium
- Allow the master node to run Tator pods (if desired):
kubectl taint nodes --all node-role.kubernetes.io/master-
This is required on a single node deployment.
You can use:
kubectl get nodes
to determine your node name(s).
- Install the nvidia device plugin (only required if you have GPU nodes)
kubectl apply -f https://raw.githubusercontent.com/NVIDIA/k8s-device-plugin/v0.6.0/nvidia-device-plugin.yml
Join worker nodes to cluster
After configuring the master node, kubeadm will print instructions for how to join other nodes to the cluster. The command will be similar to the following:
sudo kubeadm join --token <token> <master-ip>:<master-port> --discovery-token-ca-cert-hash sha256:<hash>
If you are joining a node to a cluster that has already been set up, you can generate the token and print the command needed to join with:
kubeadm token create --print-join-command
- You can check the status of the new node by executing the following on the master node:
kubectl get nodes
- Once the node is in the Ready state you can move to the next step.
Label nodes according to desired functions
Tator uses three node labels to select which node a pod can be scheduled on. They are as follows:
- gpuWorker: [yes/no] Indicates whether a node can execute GPU algorithms.
- cpuWorker: [yes/no] Indicates whether a node can execute CPU algorithms, including transcoding media.
- webServer: [yes/no] Indicates whether a node can be used for running web services, such as gunicorn or redis.
- dbServer: [yes/no] Should be used to label a specific node that has high speed storage for serving the database.
For example, for a single node without a GPU we could use the following labels:
1 2 3 4 | kubectl label nodes <node-name> gpuWorker=no
kubectl label nodes <node-name> cpuWorker=yes
kubectl label nodes <node-name> webServer=yes
kubectl label nodes <node-name> dbServer=yes
|
Make sure you apply labels for all nodes in the Kubernetes cluster.
The Kubernetes cluster is now configured and you are ready to build Tator.
Job cluster setup
Tator uses Argo to manage jobs, including transcodes and custom algorithms. These may be processed on the same Kubernetes cluster where Tator is deployed, or on a remote cluster. A remote cluster requires some additional configuration to make it accessible from the Tator cluster. In either case, the cluster must meet the following requirements:
- It must have the Argo custom resource definitions (CRD) installed.
- It must have a dynamic persistent volume (PV) provisioner. Steps are provided to install the nfs-client-provisioner.
Installing Argo
1 2 3 4 | kubectl create namespace argo
kubectl apply -n argo -f https://raw.githubusercontent.com/argoproj/argo/stable/manifests/install.yaml
sudo curl -sSL -o /usr/local/bin/argo https://github.com/argoproj/argo/releases/download/v2.8.1/argo-linux-amd64
sudo chmod +x /usr/local/bin/argo
|
Upgrade the default service acount privileges
Argo workflows are run using the default ServiceAccount from the default namespace. Therefore this account needs to have sufficient privileges to create workflows:
kubectl create rolebinding default-admin --clusterrole=admin --serviceaccount=default:default
Setting up dynamic PV provisioner
Managed Kubernetes solutions typically come with a dynamic PV provisioner included, so these steps are only required for bare metal installations. These steps are for the NFS volume provisioner, but other options are valid.
Install the nfs-client-provisioner helm chart
- From the NFS setup, there should be a folder exported called /media/kubernetes/scratch.
- Install the helm chart:
1 2 3 | kubectl create namespace provisioner
helm repo add stable https://kubernetes-charts.storage.googleapis.com
helm install -n provisioner nfs-client-provisioner stable/nfs-client-provisioner --set nfs.server=<NFS_SERVER> --set nfs.path=/media/kubernetes_share/scratch --set storageClass.archiveOnDelete=false
|
- This sets up a new storage class called nfs-client any pvc request needs to specify this as a storage class to use this provisioner.
Test the provisioner
Create a file called nfs-test.yaml with the following spec (Note the storage class requested):
1 2 3 4 5 6 7 8 9 10 11 | kind: PersistentVolumeClaim
apiVersion: v1
metadata:
name: nfs-test
spec:
accessModes:
- ReadWriteMany
storageClassName: nfs-client
resources:
requests:
storage: 1Mi
|
then apply it:
kubectl apply -f nfs-test.yaml
then check that the PVC has the status of Bound:
kubectl get pvc | grep nfs-test
If it does, the provisioner is working and you can delete the pvc:
kubectl delete pvc nfs-test
Updating kube API certificate SANs (remote job clusters only)
If your job cluster is associated with a domain name, you may need to update the API server certificate SANs.
First get the kubeadm configmap:
kubectl -n kube-system get configmap kubeadm-config -o jsonpath='{.data.ClusterConfiguration}' > kubeadm.yaml
Then modify kubeadm.yaml to include the new certificate SANs:
1 2 3 4 5 6 7 8 | apiServer:
certSANs:
- "172.29.50.162"
- "k8s.domain.com"
- "other-k8s.domain.net"
extraArgs:
authorization-mode: Node,RBAC
timeoutForControlPlane: 4m0s
|
You will need to move the existing certificates out of the default path to force them to be regenerated:
sudo mv /etc/kubernetes/pki/apiserver.{crt,key} ~
Now you can update the certificate as follows:
sudo kubeadm init phase certs apiserver --config kubeadm.yaml
And finally restart the API server by finding the docker container ID:
docker ps | grep kube-apiserver | grep -v pause
And killing this container. Kubernetes will automatically restart it:
docker kill <containerID>
Retrieving the bearer token and API certificates (remote job clusters only)
The bearer token for the default service account can be obtained via the following (run on the job cluster):
1 2 3 | SECRET_NAME=$(kubectl get secrets | grep ^default | cut -f1 -d ' ')
TOKEN=$(kubectl describe secret $SECRET_NAME | grep -E '^token' | cut -f2 -d':' | tr -d " ")
echo $TOKEN
|
The API server certificate can be obtained via the following (run on the job cluster):
1 2 3 | SECRET_NAME=$(kubectl get secrets | grep ^default | cut -f1 -d ' ')
CERT=$(kubectl get secret $SECRET_NAME -o yaml | grep -E '^ ca.crt' | cut -f2 -d':' | tr -d " ")
echo $CERT | base64 --decode
|
These should be used to update the remoteTranscodes section of values.yaml if remote transcodes are desired. They may also be used to create a JobCluster object via the admin interface for use with algorithm registrations.
Tator build system
Tator uses GNU Make as a means of executing kubectl and helm commands. Below are steps that must be followed before running your first make command, as well as functions that may be performed with the Makefile.
Clone the Tator repository
- Make sure git is installed and clone the repo:
1 2 3 | sudo apt-get install git
git clone https://github.com/cvisionai/tator.git
cd tator
|
Values file
- Copy the example values.yaml.
cp helm/tator/values-devExample.yaml helm/tator/values.yaml
Update the configuration file
The Tator configuration file is located at helm/tator/values.yaml. Modify this file to meet your requirements. Below is an explanation of important fields:
- domain
- The domain name that was set up earlier in this tutorial. (e.g. mysite.duckdns.org)
- redirects
- List of redirect domains. Requests sent to these domains will be redirected to the primary domain.
- tatorDebug
- Boolean indicating whether to enable django debug mode. Should be false for production, true for development.
- useMinJs
- Boolean indicating whether to minify JavaScript code. Should be true for production, false for development.
- requireHttps
- Boolean indicating whether accessing Tator should require HTTPS. This should be true for production, up to you for development.
- dockerRegistry
- The host and port of the cluster’s local docker registry that was set up earlier in this tutorial.
- systemImageRepo
- The host and port of the cluster’s docker registry to use for system images. This defaults to ‘cvisionai’ off dockerhub; but for development should be set to the value in dockerRegistry
- certCron.enabled
- Enable this to enable a cron job to automatically update certificates periodically from LetsEncrypt. If this is not provided, the Secret objects tls-cert and tls-key must be created manually. See scripts/cert/selfsigned.sh for an example of how to do this.
- djangoSecretKey
- A required field. You can generate an appropriate key using https://miniwebtool.com/django-secret-key-generator/
- postgresUsername
- Field that allows you to give your postgres db a user name (or if you are accessing an existing db, make sure credentials match)
- postgresPassword
- Field that allows you to set your postgres db password (or if you are accessing an existing one, provide the password here)
- redisHost
- Redis hostname. If the Redis subchart is enabled (the default), this should be “tator-redis-master”.
- elasticsearchHost
- Elasticsearch hostname. If the Elasticsearch subchart is enabled (the default), this should be “elasticsearch-master”.
- pv.nfsServer
- The IP address of the host serving the NFS shares.
- pv.path
- Indicates the path to your NFS share.
- pv.nfsMountOptions
- Mount options for the NFS share.
- pvc.size
- Indicates the size of the persistent volume corresponding to the NFS share. Thsi can be modified according to available space on your NFS share.
- hpa.nginxMinReplicas
- hpa.gunicornMinReplicas
- hpa.daphneMinReplicas
- hpa.tusdMinReplicas
- hpa.gunicornMinReplicas
- Indicates the minimum number of pods to scale for a given service
- hpa.nginxMinReplicas
- hpa.gunicornMinReplicas
- hpa.daphneMinReplicas
- hpa.tusdMinReplicas
- hpa.gunicornMinReplicas
- Indicates the maximum number of pods to scale for a given service
- hpa.nginxCpuPercent
- hpa.gunicornCpuPercent
- hpa.daphneCpuPercent
- hpa.tusdCpuPercent
- hpa.gunicornCpuPercent
- Indicates the percentage to monitor to scale a new pod for a given service
- metallb.enabled
- A boolean indicating whether metallb subchart should be installed. This should be true for bare metal but false for cloud providers as in these cases a load balancer implementation is provided.
- metallb.ipRangeStart
- metallb.ipRangeStop
- Indicates the range of assignable IP addresses for metallb. Make sure these do not conflict with assignable IP addresses of any DHCP servers on your network. Verify the selected loadBalancerIp falls into this range
- metallb.loadBalancerIp
- The external IP address of the load balancer. This is where NGINX will receive requests. For single node deployments this can be the same as the IP address of the node on the LAN (e.g. 192.168.1.100). It is ideal if this is a static IP address. This ip address should be within the inclusive range of metallb.ipRangeStart and metallb.ipRangeStop.
- redis.enabled
- A boolean indicating whether redis should be enabled. On cloud providers you may wish to use a managed cache service, in which case this should be set to false.
- postgis.enabled
- A boolean indicating whether the postgis pod should be enabled. On cloud providers you may wish to use a managed postgresql service, in which case this should be set to false.
- postgis.hostPath
- Specifies the host path for the postgres data directory. This should be a path to high speed storage (preferably SSD) on a specific node. The node running the database should have been specified in the kubernetes setup step via the dbServer node label.
Update your domain to access the load balancer
Tator will be accessed via the loadBalancerIp defined in your values.yaml. If you are using Tator locally, update
your domain to point to this IP address. If you are setting up a website,
you will need to route external traffic to this load balancer IP address using your router or other network infrastructure.
Building Tator
- Navigate to where you cloned this repository.
- Update submodules
git submodule update --init
- Install sphinx and sphinx rtd theme modules
1 2 | sudo apt-get install python3-sphinx
pip3 install sphinx-rtd-theme recommonmark
|
- Install mako and progressbar2
1 2 | sudo apt-get install python3-pip
pip3 install mako progressbar2
|
- Install node
1 2 | curl -sL https://deb.nodesource.com/setup_10.x | sudo -E bash -
sudo apt-get install nodejs
|
- Install npm packages
sudo apt install npm
npm install
- Install Tator
This will attempt to create all docker images and install the Tator helm chart.
make cluster
- Check the status
It will take a little while for all the services, pods, and volumes to come up. You can check status with the following command:
make status
- Once all pods show the status “Ready” use the following command to copy over static files:
make collect-static
- Open the site. Open your browser and navigate to mydomain.duckdns.org (or whatever your domain is). If you get a login page, congrats! You have completed the Tator build process.
If something goes wrong (and it probably will the first time), there are a few steps to clear away a broken/incomplete install and start over at make cluster:
helm ls -a
helm delete tator
make clean
Setting up a root user
Before you can log in, you will need to create a root user account.
- Use the following command to get a bash shell in the gunicorn pod:
make gunicorn-bash
- Use manage.py to create a super user:
python3 manage.py createsuperuser
- Follow the prompts to create a login.
- Try logging in at the login screen.
Tator admin console
The admin console is the primary means of configuring Tator users and projects. It can be accessed at the /admin URI (mydomain.duckdns.org/admin). At this page a token can be created for the super user account.
Use the admin console to configure your user account, projects, media types, annotations, and attributes.